Setting Up/Removing eBills
Setting Up/Removing eBills
General Information:
eBills allow you to receive your billing statement through our Bill Pay platform. This provides a simple and easy way to organize your bills.
What you need know:
- eBill capability needs to be offered by the Payee
- eStatement set up is sometimes required by the Payee to enable eBills
- Some Payees will require additional verification by you when the eBills are established. Account verification may vary by Payee this includes OTP or challenge questions.
- Ensure your log on information is current with the payee as well as your contact information in your profile.
- Have a billing statement ready
Member Steps – Setting Up eBills:
You can enroll in eBills via the “Bill Pay Dashboard” or “Pay Bills” following the steps below:
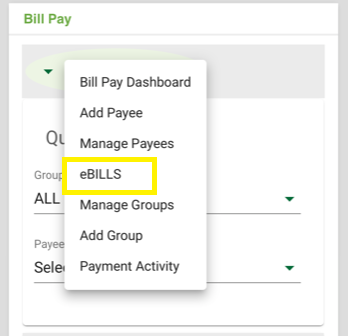
- Click on EBILLS
- Click on Enroll for the applicable Payee and follow the enrollment process
.png)
NOTE:
- If the Payee has different accounts they provide eBills for you will be asked to select the type of account you have established.
- Each Payee has their unique way to verify identity, and enrollment process.
- Online enrollment at the Payee’s website may be required.
- While the account records are pulled and verified you should not navigate away from the page. It is normal for the page to take 1-3 minutes to load.
- The payee may require verification such as OTP or challenge questions to set up the eBill.
- Validation of account may be required.
- The eBill may be available immediately if supported by the Payee. If you are between payment statement cycles it may take a few days.
Mobile
Member Steps – Setting up eBills
1. From the Bill Pay Dashboard, select the arrow and select eBills:

2. Select “Enroll” for the applicable Payee and follow the enrollment process
.png)
NOTE:
- If the Payee has different accounts they provide eBills for you will be asked to select the type of account you have established.
- Each Payee has their unique way to verify identity, and enrollment process.
- Online enrollment at the Payee’s website may be required
- While the account records are pulled and verified you should not navigate away from the page. It is normal for the page to take a 1-3 minutes to load.
- OTP from Payee may be needed
- Validation of account may be required
- The eBill becomes available immediately.
How To View eBills
.png)
- It will give you the countdown of when payment is due
- Provide minimum payment amount due or total balance and due date
- Click on the PDF icon to see the eBill statement
- File the bill when it is no longer needed
.png)
If the Payee allows autopay via eBills you can set up easily. If it's not available it will display "unavailable".
Removing eBills:
You can remove eBills via the “Bill Pay Dashboard” or “Pay Bills” following the steps below:
1. Click on EBILLS
2. Under the Enrolled list select the Payee you want to remove by selecting the arrow down

3. Select “Stop receiving”
.png)
You will receive a confirmation to approve the change
.png)
NOTE: Once “Yes, Stop eBills” is selected you will receive a banner confirmation of the change. Change is immediate.